
Custom enrichment overlays
Custom enrichment overlays let you render HTML and JavaScript on top of Videos, including interactive elements and limited player control (for example, play and pause). Use them when CMS-built layers aren't enough and your app needs a custom overlay experience.
This page is the Concepts contract for enrichment overlays: what they are, how the render function works, hosting rules, and bounds. For other player presentation topics, see Content player and presentation.
Who does what
- Your app / developers: Build the enrichment script (
renderEnrichment), host the file on a public URL, and pass any app-specificuserContext. - WSC Sports: Wire the enrichment URL and bounds JSON into the Experiences environment after you provide them.
- Content managers: Do not author enrichment scripts in CMS. Use CMS layers when those meet the need.
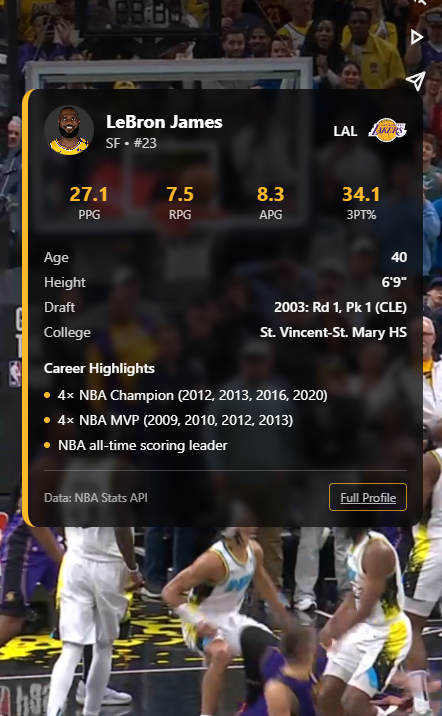
Custom enrichment code requirements
Custom enrichment overlays use a JavaScript file that returns an HTML snippet rendered within a shadow DOM. The enrichment must run in a secure, isolated environment and must follow the rules in this article.
- Export a single async function:
export async function renderEnrichment(context); - The function must return an HTML snippet as a string.
- The returned HTML is injected into a shadow DOM (
clientDocument), which isolates styles and logic from the parent application. - To set up enrichments with WSC Sports, provide:
- A shared folder (Google Drive or CDN) updated in real time with your enrichment layers
- The enrichment URL and a JSON bounds specification
Enrichments can include styling (including external fonts) and player controls such as pause and play.
Shadow DOM and scoped access environment rules
Because the enrichment is loaded into an isolated Shadow DOM inside an iframe, standard DOM access (for example document.getElementById) and script execution don't work the same way as on a regular HTML page. Use the table that follows.
| Task | What to do | Why |
|---|---|---|
| Access HTML elements | Use window.clientDocument instead of document | The enrichment is in an isolated Shadow DOM inside an iframe |
| Define callback functions | Attach globally using window.myEnrichment_callback() | Ensures the system can find and invoke the function reliably |
Example:
// Declare your callback on the window object
window.myEnrichment_printHello = function () {
  console.log('hello');
};

// Return an HTML snippet with a button and event binding
return `
  <div>
    <button id="myBtn">Say hello</button>
  </div>
  <script>
window.clientDocument.getElementById('myBtn').addEventListener('click', function(e) {
        myEnrichment_printHello();
      });
  </script>
`;
Hosting and CORS requirements
Your enrichment JavaScript file must be hosted on a publicly accessible URL without CORS restrictions.
If your enrichment makes external API calls, those APIs must allow CORS requests from the WSC Sports storage domain.
To use the enrichment, give your WSC Sports account manager the URL and a JSON with the bounds specification.
Enhancement options
Overlays can be enhanced to provide context and to control the media player.
Use context to customize the experience
The context object provided to the renderEnrichment function allows you to enrich the HTML snippet with dynamic and personalized data. It consists of the following parts:
| Property | Description |
|---|---|
sdkContext | Contains service provider entity IDs from the host platform, such as the current player, team, game, or season. Use this to tailor the enrichment based on the content being played. |
userContext | A custom dictionary provided by your app. Ideal for viewer-specific data such as preferences, feature flags, or profile information. |
Context JSON
{
  "sdkContext": {
    "playerId": 0,
    "teamId": 0,
    "gameId": 0,
    "roundId": 0,
    "seasonId": 0
  },
  "userContext": {
    "key1": "value1"
  }
}
Example
export async function renderEnrichment(context) {
  const playerId = context.sdkContext.playerId;
  const userName = context.userContext.username || 'Guest';

  return `
    <div>
      <p>Welcome, $USERNAME!</p>
      <p>You're currently watching Player ID: ${playerId}</p>
    </div>
  `;
}
Media player control
HTML buttons, paired with the triggerExternalFunction, let the overlay control the media player.
The player functions supported are: play, pause, goToNextPage, goToPreviousPage, setAppContext. The snippet that follows shows the implementation.
<button onclick="triggerExternalFunction('pause')">pause</button>
<button onclick="triggerExternalFunction('play')">play</button>
<button onclick="triggerExternalFunction('goToNextPage')">goToNextPage</button>
<button onclick="triggerExternalFunction('goToPreviousPage')">goToPreviousPage</button>
<button onclick="triggerExternalFunction('setAppContext', {hello: 'world'})">setAppContext</button>
Styling the enrichment
The overlay can be styled. Consider the sections that follow in the styling.
Inline styles
Inline styles using <style> tags are supported. These styles are scoped to your Shadow DOM, ensuring they won’t leak into or be affected by global styles.
Since your enrichment runs inside a Shadow DOM embedded within an iframe overlay, your styles are fully isolated. This isolation helps prevent conflicts with surrounding content, but it also means you’re responsible for managing layout, accessibility, and responsiveness within the enrichment itself.
Keep in mind that the enrichment layer may appear across a wide range of devices, from mobile phones to tablets and desktops, so it must adapt gracefully to varying screen sizes and resolutions. The section that follows contains responsive design guidance.
External fonts
External fonts are supported. Use the example that follows as a guide on loading fonts.
<script>
  const font = new FontFace("Font Name", "url(external-font-url)", {
    style: "normal",
    weight: "700",
  });

  font.load().then((loaded_face)=> {
    document.fonts.add(loaded_face)
  });
</script>
Responsive design guidance
✅ Do
- Use fluid units like %, em, rem, or vw/vh
- Use max-width, flex, and grid for layout
- Test on multiple devices
- Keep buttons/text touch-friendly (min 44x44px)
❌ Don’t
- Avoid fixed px dimensions for layout or containers
- Avoid hard-coded widths that break on small screens
- Assume desktop dimensions
- Use tiny elements that are hard to tap
Enrichment best practices
- Use semantic HTML and ARIA roles to enhance accessibility and compatibility.
- Avoid large animations or transitions that may affect performance, especially on lower-end devices.
- Test across real device breakpoints, including:
- Mobile portrait (375px)
- Mobile landscape (667px)
- Tablet (768–1024px)
- Desktop (1440px+)
Example
<style>
  #myBtn {
    background-color: #007bff;
    color: white;
    border: none;
  }
</style>
<button id="myBtn">Click Me</button>
<script>
  window.clientDocument.getElementById('myBtn').addEventListener('click', () => {
    console.log('Clicked!');
  });
</script>
Implementation checklist
Do
- Use
window.clientDocumentfor DOM queries inside the enrichment - Attach callbacks on
windowwith unique names (for examplewindow.myEnrichment_handleClick) - Use
<style>tags for styles scoped to the Shadow DOM - Host the enrichment script on a publicly accessible URL
- Ensure the script is CORS-accessible
Don't
- Use
document.getElementById()(or otherdocumentqueries) for enrichment DOM access - Assume parent-page global styles will apply inside the Shadow DOM
- Host the enrichment on a private or CORS-blocked URL
Example
export async function renderEnrichment(context) {
  window.myEnrichment_printHello = function () {
    alert('Hello from enrichment!');
  };

  return `
    <style>
      #myBtn {
        background-color: #28a745;
        color: white;
        padding: 10px;
        border: none;
        border-radius: 4px;
        cursor: pointer;
      }
    </style>
    <button id="myBtn">Say Hello</button>
    <script>
      window.clientDocument.getElementById('myBtn').addEventListener('click', function(e) {
        myEnrichment_printHello();
      });
    </script>
  `;
}
Bounds
Position
| Field | Description | Default |
|---|---|---|
xPosition | Defines horizontal alignment: supports StartToStart, CenterX, EndToEnd. | StartToStart |
yPosition | Defines vertical alignment: supports TopToTop, CenterY, BottomToBottom. | TopToTop |
xOffset | Optional offset on the X-axis, in pixels. | 0 |
yOffset | Optional offset on the Y-axis, in pixels. | 0 |
xRelativeTo | Reference point for the X position: Player or Screen. | — |
yRelativeTo | Reference point for the Y position: Player or Screen. | — |
Note: Always set
xRelativeToandyRelativeToexplicitly, and set both to the same value. Mixing references — for examplePlayerfor X andScreenfor Y — is not supported.
Size
| Field | Description | Default |
|---|---|---|
absoluteWidth | Absolute width of the enrichment, in pixels (density-independent pixels on mobile). | null |
absoluteHeight | Absolute height of the enrichment, in pixels (density-independent pixels on mobile). | null |
widthRatio | Width as a ratio of the reference set in position (between 0 and 1). | null |
heightRatio | Height as a ratio of the reference set in position (between 0 and 1). | null |
Note: Set exactly one width option and one height option — either
absoluteWidthorwidthRatio, and eitherabsoluteHeightorheightRatio. Setting both options on the same axis, or leaving both unset, results in unpredictable sizing.Size is always relative to the same reference you set in Position.
Example
{
  "position": {
    "xPosition": "CenterX",
    "xOffset": 0,
    "xRelativeTo": "Player",
    "yPosition": "CenterY",
    "yOffset": 150,
    "yRelativeTo": "Player"
  },
  "size": {
    "widthRatio": 0.9,
    "heightRatio": 1
  }
}
Updated 2 months ago